Docker - Mini server as PVR receiver for DVB-T/S/C

For a long time, I used a PVR:hard disk receiver, specifically a Dreambox DM7020HD with 2 DVB-C tuners, to supplement my TV. Originally for recording certain programs, later to be able to watch live TV purely via WLAN without a network or coax cable with a FireTV stick and to consume the recorded programs as a stream. Unfortunately, the Dreambox gave up the ghost after more than 10 years and simply wouldn't boot up. While looking for a replacement, I realized that new devices for classic TV reception with DVB-S/C are in short supply. It seems that the market for hard disk receivers has shrunk massively in the last 10 years thanks to various streaming services. Unwilling to pay several hundred euros for 7-year-old hardware or take out a subscription for an IP streaming service, I came up with the idea of simply equipping my existing mini server with a DVB-C tuner in the form of a USB stick:
Existing Docker mini server replaces PVR hard disk receiver
Not only the receivers, but also the available software has usually been on the market for a while and so the widespread and free service Tvheadend has very good stability and an ingenious range of functions, but a user interface that is not necessarily up to date. Once set up, access takes place via a corresponding client such as Kodi anyway, which means that direct access to the Tvheadend user interface is likely to be limited, at least for me. I use a Beelink 5560U as my mini PC and I use the following USB stick for TV reception:

If you already have a Docker setup running, you don't have to worry about certain dependencies on other software packages. The PVR service and its container can simply be started in the terminal with "docker run": Docker Basics
A container is an isolated environment independent of the operating system (OS):
When a container is first launched, Docker independently loads all the necessary sources
from the internet.
Docker can be installed on Windows, macOS or an Linux Distribution
docker run -d \
  --name=tvheadend \
  -e PUID=1000 \
  -e PGID=1000 \
  -e TZ=Etc/UTC \
  -e RUN_OPTS= `#optional` \
  -p 9981:9981 \
  -p 9982:9982 \
  -v /path/to/tvheadend/data:/config \
  -v /path/to/recordings:/recordings \
  --device /dev/dri:/dev/dri `#optional` \
  --device /dev/dvb:/dev/dvb `#optional` \
  --restart unless-stopped \
  lscr.io/linuxserver/tvheadend:latest
Once started, Tvheadend can be accessed in the browser via the IP address of the Docker server and port 9981:
When setting up, I had the problem that no channels were found. Coincidence or not: Only after I added the "linux-firmware-haupauge" package to the host operating system did the channel scan work, hence the commands used here for the host operating system, in my case Ubuntu:
sudo add-apt-repository ppa:b-rad/kernel+mediatree+hauppauge
sudo apt-get install linux-firmware-hauppauge
Here are a few screenshots of my settings in TVheadend
First, I created a network under Configuration / DVB-Inputs / Network:

The network can then be assigned to the connected TV adapters, in my case the two adapters of the Hauppauge WinTV-dualHD TV stick, and searched for channels:


The TV channels should appear under "Services" after a while.
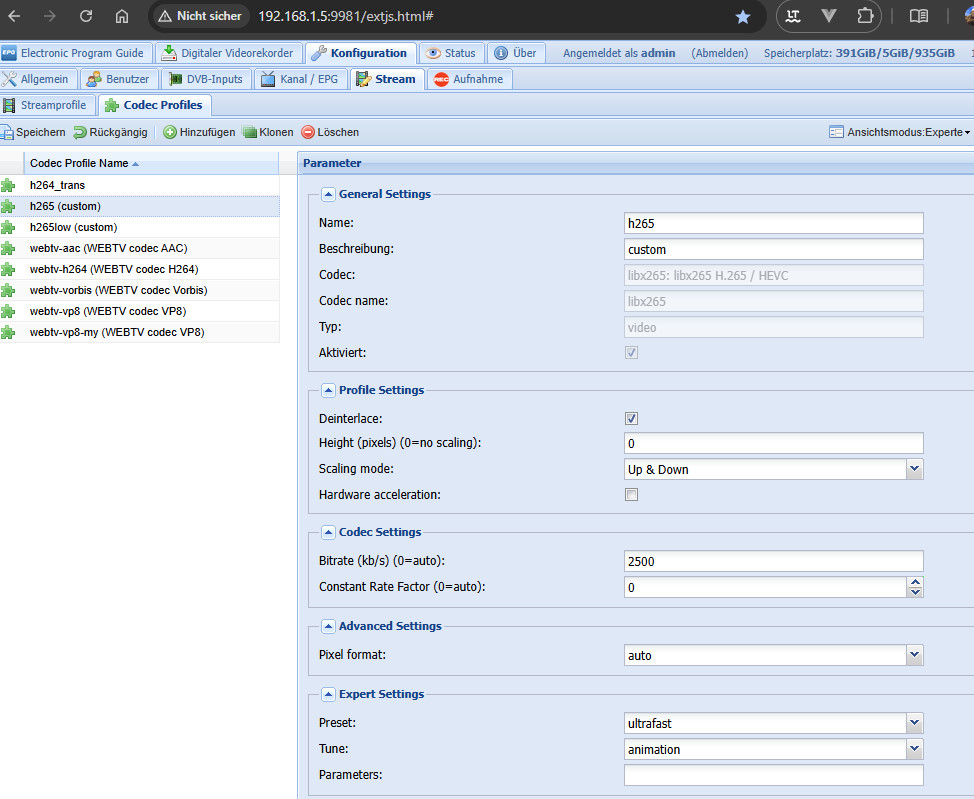
Direct transcoding to H.265 (HEVC)
If you are using a reasonably high-performance mini PC, you can transcode the recordings on the fly as H.264 or even better with H.265, which means that they require very little memory and still have very good quality. For HD quality, the stream is reduced from around 10 kB/s to 2.5 kB/s with H.265. As a result, the CPU of my Mini-PC achieves a load of around 20% per stream, which is no problem when using 2 tuners.


I used "MPEG-TS/av-lib" as the container, as otherwise switching to a different time (skip) would only work with a very long delay.
The profile can then be used for all recordings:

Since the mini PC has 32GB RAM, I changed the timeshift to "RAM only" to protect the SSD hard disk.

Access on the move via the Internet: Secure and without VPN
To be able to program certain shows on the go or stream shows live to my smartphone, I have added a user name and password to the default user in Tvheaden. An additional DNS entry on the Internet and the existing port forwarding including reverse proxy allows me access via the Internet, completely without VPN, see: secure https connection: Traefik Reverse Proxy + Let's Encrypt
Here is my used Docker-Compose config:
Docker-Compose.yaml file
services:
  tvheadend:
    image: lscr.io/linuxserver/tvheadend:latest
    container_name: tvheadend
    environment:
      - PUID=1000
      - PGID=1000
      - TZ=Vienna
      - RUN_OPTS= #optional
    labels:
      - "traefik.enable=true"
      - "traefik.http.routers.tv.rule=Host(`tv.domain.tld`)"
      - "traefik.http.routers.tv.entrypoints=websecure"
      - "traefik.http.routers.tv.tls.certresolver=myresolver"
      - "traefik.http.services.tv.loadbalancer.server.port=9981"
    volumes:
      - ./data:/config
      - ./recordings:/recordings
    ports:
      - 9981:9981
      - 9982:9982
    devices:
      - /dev/dri:/dev/dri #optional
      - /dev/dvb:/dev/dvb #optional
    restart: always
networks:
  default:
    name: webproxy
    external: true
Client access
For access in the local network, I use several FireTV sticks and a tablet with Kodi as a client. I currently access the Internet via the Tvheadend web interface. I currently access the Internet via the Tvheadend web interface. Since the web interface is not optimized for mobile devices, I am currently testing TVHadmin-JS and Jellyfin with the TVHeadend plugin at the same time.
Conclusion
Switching from a classic PVR hard disk receiver to a mini-server setup with Docker and a DVB-C USB stick has proven to be a viable solution. The Beelink 5560U Mini-PC in combination with the Hauppauge WinTV-dualHD TV stick and Tvheadend under Docker provides a solid foundation for TV reception and streaming for multiple TV sets. The setup enables direct transcoding of recordings to H265 and access via the Internet.
 ({{pro_count}})
{{percentage}} % positive
 ({{con_count}})