Docker - Mini server as PVR receiver for DVB-T/S/C

Television has changed drastically in recent years. With the advent of streaming services, traditional TV reception is increasingly taking a back seat. Nevertheless, I didn't want to give up my tried-and-tested television, but was forced to rethink my central television solution as my Dreambox refused to work.
Central TV tuner / (PVR) server via WLAN for all televisions.
For a long time, I used a PVR:hard disk receiver, specifically a Dreambox DM7020HD with 2 DVB-C tuners, to supplement my TV. Originally for automatic recording of certain programs so that I could skip the commercials, later to be able to watch live TV purely via WLAN without a network or coax cable with a FireTV stick and to consume the recorded programs as a stream: centrally purely via LAN / WLAN for all TVs in the house. Unfortunately, the Dreambox gave up the ghost after more than 10 years. While looking for a replacement, I realized that new devices with a similar range of functions to the Dreambox are in short supply. It seems that the market for hard disk receivers has shrunk massively in the last 10 years thanks to various streaming services. Not wanting to pay several hundred euros for 7-year-old hardware or take out a subscription for an IP streaming service, I came up with the idea of simply equipping my existing mini server, a Beelink 5560U, with appropriate DVB tuners: I installed Ubuntu and Docker as the operating system, which means the server can also run other services, such as my home control system. The Beelink 5560U requires very little power and is performant enough to also take over the PVR service. This allowed me to remove the Dreambox without replacing it, meaning one less device with standby power consumption.
Existing Docker mini server replaces PVR hard disk receiver
Not only the receivers, but also the available software has usually been on the market for a while and the widespread and free service Tvheadend has an ingenious range of functions, but a user interface that is not necessarily up to date. Once set up, access takes place via a corresponding client such as Kodi anyway, which means that direct access to the Tvheadend user interface is likely to be limited, at least for me. The advantage of TVHeadend compared to other services is the simple direct transcoding of recordings into another format and the possible support of OSCAM to decode encrypted channels.
Software: TVHeadend - Versions: "latest" not always sufficiently tested?
TVHeadend is still being actively developed, but now only as a rolling release. Every change flows directly into "latest" in GitHub, which means that certain changes may be tested less? At least I had the problem several times that after a container update, essential functions such as transcoding recordings only worked partially or no longer worked, the sound was no longer synchronized or the image simply remained dark. Some of the update problems were due to a change in the configuration, which could be resolved by rebuilding the settings. For this reason, I am not using "latest" here for the Docker containers used in the article, but a version that I have been using for some time without any problems. If I change this, I will include new versions in this article after successful testing.
Hardware USB problematic? Tuner: DVB-C (USB)
I used the following USB stick for DVB-C TV reception:
If you already have a Docker setup running, you don't need to worry about dependencies on other software packages. The PVR service and its container can simply be started in the terminal with "docker run":
Docker Basics
Docker allows applications to be launched by command in a so-called container.A container is an isolated environment independent of the operating system (OS):
When a container is first launched, Docker independently loads all the necessary sources
from the internet.
Docker can be installed on Windows, macOS or an Linux Distribution
docker run -d \
  --name=tvheadend \
  -e PUID=1000 \
  -e PGID=1000 \
  -e TZ=Europe/Berlin \
  -e RUN_OPTS= `#optional` \
  -p 9981:9981 \
  -p 9982:9982 \
  -v /path/to/tvheadend/data:/config \
  -v /path/to/recordings:/recordings \
  --device /dev/dri:/dev/dri `#optional GPU-Passthrough` \
  --device /dev/dvb:/dev/dvb `#optional USB DVB-Adapter` \
  --restart unless-stopped \
  linuxserver/tvheadend:version-26a14aa3
The DVB-C USB stick (tuner) is mapped into the container with --device.
After the start, Tvheadend can be called in the browser via the IP address of the Docker server and port 9981:
When setting it up, I had the problem that no channels were found. Only after I added the "linux-firmware-haupauge" package to the host operating system did the channel scan work, hence the commands used here for the host operating system, in my case Ubuntu:
sudo add-apt-repository ppa:b-rad/kernel+mediatree+hauppauge
sudo apt-get install linux-firmware-hauppauge
Due to the positive experience with the Haupauge DVB-C adapter, I wanted to use the Hauppauge WinTV Nova S2 USB stick for a DVB-S setup. I had received Rev. BBH9 as the hardware version, which according to the manufacturer's website - as of October 2025 - is not supported: only the versions: Rev B6H9, or older.
Not supported: WinTV-NOVA-S2: BBH9:

I was still able to activate the USB stick with the following commands:
cd /lib/firmware/
sudo wget https://hauppauge.s3.us-east-1.amazonaws.com/linux/dvb-demod-m88ds3103c.fw
sudo apt install linux-mediatree
I was then able to use the stick for certain channels, but unfortunately not for all: certain muxes were not found and when using an existing mux of another TV adapter, the WinTV-NOVA-S2 simply could not tune certain channels for me.
Here as a comparison: With Network Astra192e, 1336 services were found after a "force scan", with the main eye tuner (Astra192e main eye) only 670 services work.

USB DVB adapters require a driver in the host operating system, which can make setup difficult or sometimes impossible. Hardware and driver support for future operating system updates is also not guaranteed.
Tuner: DVB-S USB vs. SAT>IP
Having started with DVB-C, I have now also tested my setup with DVB-S. A SAT dish and a SAT>IP server for TVHeadend can be used as hardware. SAT>IP is completely unproblematic with regard to the necessary drivers, as the drivers are loaded internally in the SAT>IP server: TVHeadend only requires a network connection to the SAT>IP server.


The Digibit Twin SAT>IP server enables very stable operation and simpler installation, as the server can be placed near the satellite dish and connected to the TVHeadend server from there with a network cable. The only small disadvantage: the Digibit Twin has a measured standby consumption of 3 watts, even when no tuner is active, although the technical data states < 0.3 watts. With an active tuner, the consumption is approx. 6 watts and with 2 tuners approx. 7.5 watts.
Commissioning SAT>IP Digibit Twin
After connecting to the network, the Digibit Twin obtains an IP address from the DHCP. Entered in the browser, the SAT>IP server responds with a password dialog:

The default password of the TELESTAR Digibit Twin is "admin".
After logging in, there are exactly 3 menu items: Status, Network and System:


The settings are therefore limited to the IP address, changing the password for access and the option to import new firmware versions.
The Digibit Twin only registered in TVHeadend (Configuration / DVB Inputs / TV Adapters) after I entered the path to the description.xml of the SAT>IP server under RUN_OPTS in Docker:
docker run -d \
  --name=tvheadend \
  -e PUID=1000 \
  -e PGID=1000 \
  -e TZ=Europe/Berlin \
  -e  RUN_OPTS= --satip_xml http://192.168.1.144:38400/description.xml
  --network host \
  -v /path/to/tvheadend/data:/config \
  -v /path/to/recordings:/recordings \
  --restart unless-stopped \
  linuxserver/tvheadend:version-26a14aa3
To use several SAT>IP servers, several SAT-IP addresses can be entered in succession here. I also had to change the network mode to "host" so that communication to the port range required for SAT>IP works without restriction.
Irdeto? Smartcard reader integration - a technical feasibility study
Important legal notice
This article is intended solely as technical documentation and to provide information about the functionality.
The use of alternative hardware or software for decrypting pay TV or basic encryption signals (such as those of ORF) is only permitted in Austria with the means authorized by the programme provider (e.g. ORF CI+ module and registered smartcard).
The author expressly distances himself from any illegal use of the technical information described here and accepts no liability for damage or legal infringements resulting from improper or unauthorized use.
Oscam - EasyMouse
In a test environment, a smartcard reader could read technical signals from smartcards via services such as OSCAM and integrate them into a backend system such as TVHeadend. The following documentation describes the necessary technical steps:
Hardware setup:
In this setup, the EasyMouse registers on the Mini-PC as /dev/ttyUSB0. The hardware settings on the card reader are typically set to the requirements of the smartcard and the chipset (here exemplary for Smartmouse 2): 5V, Phoenix, 3.579MHz.

Hardware example:

Docker Compose configuration (example)
The following example shows the integration of the card reader into the oscam container and the link with tvheadend:
services:
  tvheadend:
    image:  linuxserver/tvheadend:version-26a14aa3
    container_name: tvheadend
    environment:
      - PUID=1000
      - PGID=1000
      - TZ=Europe/Berlin
      - RUN_OPTS= --satip_xml http://192.168.1.144:38400/description.xml #optional für digibit twin
    volumes:
      - ./data:/config
      -  /mnt/store/daten/recordings:/recordings
      - ./TVHadmin-JS:/usr/share/tvheadend/src/webui/static/TVHadmin-JS
    network_mode: host
    devices:
      - /dev/dri:/dev/dri #optional Grafikkarte GPU
      - /dev/dvb:/dev/dvb #optional für usb-dvb (z.B. Haupauge)
    restart: always
  oscam:
    image: lscr.io/linuxserver/oscam:latest
    container_name: oscam
    group_add:
      - dialout
    environment:
      - PUID=1000
      - PGID=1000
      - TZ=Etc/UTC
    volumes:
      - ./oscam:/config
    ports:
      - 8888:8888
      - 6666:6666
    devices:
      - /dev/ttyUSB0:/dev/ttyUSB0
    restart: unless-stopped
OSCAM configuration (excerpt)
The following configuration files show the necessary technical parameters, to read the smartcard and provide the service for TVHeadend.
Files: oscam.conf
[global]
logfile                       = stdout

[dvbapi]
enabled                       = 1
au                            = 1
pmt_mode                      = 1
request_mode                  = 1
listen_port                   = 6666
user                          = tvh
boxtype                       = pc

[webif]
httpport                      = 8888
httpuser                      = admin
httppwd                       = [SICHERES PASSWORT]
httpallowed                   = 127.0.0.1,172.16.0.0-172.31.255.255,192.168.0.0-192.168.255.255,10.0.0.0-10.255.255.255,255.255.255.255
oscam.user
[account]
user                          = tvh
au                            = 1
group                         = 1
oscam.server
[reader]
label                         = mouseReader
protocol                      = mouse
device                        = /dev/ttyUSB0
caid                          = 0650
boxkey = [WICHTIG: TECHNISCHER PARAMETER ZUR KARTEN-KOMPATIBILITÄT]
rsakey = [WICHTIG: TECHNISCHER PARAMETER ZUR VERSCHLÜSSELUNG]
detect = cd
group = 1
emmcache = 1,3,2,0
NOTE: The technical parameters boxkey and rsakey required for Irdeto mode are for compatibility and decryption purposes and cannot be published here for legal reasons.
In TVHeadend, the default view level: Expert is initially required in the settings:

OSCAM can be connected as follows:

Known bug in TVHeadend: ORF2 national/regional: Stream Crash
According to a current discussion on the TVHeadend page, the ORF2 channel becomes unusable under certain circumstances: As reported in the discussion, the picture stops before the daily program Bundesland heute (Salzburg heute, Kärnten heute, Wien heute, etc.) and after the program the channel crashes completely, which can only be fixed by restarting TVHeadend, see: https://github.com/tvheadend/tvheadend/issues/1973 and https://tvheadend.org/d/9260-orf-2-stream-crash-on-tvh-server
A possible workaround is to restart TVHeadend in the event of an error, or to switch to a still functioning channel from another federal state after the end of "Bundesland heute", e.g. "Salzburg heute".
For the automatic change, 2 services could be assigned to the channel: ORF2W HD and ORF2S HD to one channel, here "2 ORF2HD" (ORF2S HD could be renamed to ORF2HD in the channels):
The idea: after the end of the regional stream, ORF2W HD should be used instead of ORF2S HD.
Until the end of the regional stream, the regional service should remain active until the stream crashes:

If the stream no longer works, it can be reactivated by switching to another - still functioning - service:

A CA stream filter helps to ensure that the crash can be detected in the logs:

The following bash file can change the priority of a service or deactivate or activate a service:
Bash file: changeprio.sh
#!/bin/bash

# Configuration
TVH_IP="192.168.1.x"
TVH_PORT="9981"
TVH_USER="admin"
TVH_PASS="tvhPassword"

# Usage: changeprio.sh <new_priority> <service_name> [service_index]
NEW_PRIORITY="$1"
SERVICE_NAME="$2"
SERVICE_INDEX="${3:-1}"  # default to 1 if not provided

if [ -z "$NEW_PRIORITY" ] || [ -z "$SERVICE_NAME" ]; then
    echo "$(date +"%d.%m.%Y %H:%M:%S") Usage: $0 <new_priority> <service_name> [service_index]"
    echo "Example: $0 1 'ORF2W HD' 1"
    exit 1
fi

# validate SERVICE_INDEX is a positive integer
if ! [[ "$SERVICE_INDEX" =~ ^[0-9]+$ ]] || [ "$SERVICE_INDEX" -lt 1 ]; then
    echo "❌ Invalid service_index: must be a positive integer."
    exit 1
fi

BASE_URL="http://$TVH_IP:$TVH_PORT/api"

echo "Searching for service matches for: $SERVICE_NAME (selecting index: $SERVICE_INDEX)"

# Query service list once and gather matches as "uuid||text" lines
SERVICE_LIST_JSON=$(curl -s --digest --user "$TVH_USER:$TVH_PASS" \
    "$BASE_URL/service/list?enum=0" 2>/dev/null)

if [ -z "$SERVICE_LIST_JSON" ]; then
    echo "❌ Error: Tvheadend API unreachable or curl failed."
    exit 1
fi

# Build lines of "uuid||text" for matching entries
MATCH_LINES=$(echo "$SERVICE_LIST_JSON" | jq -r --arg name "$SERVICE_NAME" \
    '.entries[] | select(.text | contains($name)) | "\(.uuid)||\(.text)"')

# Count matches
MATCH_COUNT=$(echo "$MATCH_LINES" | grep -c . || true)

if [ "$MATCH_COUNT" -eq 0 ]; then
    echo "❌ No services found matching '$SERVICE_NAME'."
    exit 1
fi

# Select the chosen match (1-based)
SELECTED_LINE=$(echo "$MATCH_LINES" | sed -n "${SERVICE_INDEX}p")
SERVICE_UUID="${SELECTED_LINE%%||*}"
SERVICE_TEXT="${SELECTED_LINE#*||}"

if [ -z "$SERVICE_UUID" ]; then
    echo "❌ Failed to select service UUID."
    exit 1
fi

echo "✅ Selected [$SERVICE_INDEX]: $SERVICE_TEXT (UUID: $SERVICE_UUID)"
echo "Setting priority to: $NEW_PRIORITY"

# Prepare payload and send update
if [ "$NEW_PRIORITY" = "disable" ]; then
    # Prepare payload to disable the service
    RAW_JSON_PAYLOAD="{\"uuid\":\"$SERVICE_UUID\",\"enabled\":false}"
else
    # Priority change payload
    RAW_JSON_PAYLOAD="{\"uuid\":\"$SERVICE_UUID\",\"priority\":$NEW_PRIORITY,\"enabled\":true}"
fi
DATA_STRING="node=$RAW_JSON_PAYLOAD"

RESPONSE=$(curl -s --digest --user "$TVH_USER:$TVH_PASS" \
    "$BASE_URL/idnode/save" \
    --data "$DATA_STRING")

CURL_STATUS=$?
if [ $CURL_STATUS -ne 0 ]; then
    echo "❌ CRITICAL ERROR: Curl command failed with status $CURL_STATUS."
    exit 1
fi

# Parse response
if ! echo "$RESPONSE" | jq . >/dev/null 2>&1; then
    echo "❌ JQ ERROR: Failed to parse JSON response. Raw Response below:"
    echo "$RESPONSE"
    exit 1
fi

if echo "$RESPONSE" | jq -e '.error' >/dev/null 2>&1; then
    echo "❌ API Error during save. Response from Tvheadend:"
    echo "$RESPONSE" | jq .
    exit 1
fi

echo "✅ SUCCESS! Priority for '$SERVICE_TEXT' is now set to $NEW_PRIORITY."
echo "Response: $(echo "$RESPONSE" | jq .)"
Another bash script could determine when the switch from the regional to the national stream takes place and adjust the services accordingly:
Watchdog File: watchdog.sh for operation in a Docker container:
#!/bin/bash

# --- Konfiguration ---
CONTAINER_NAME="tvheadend"
SEARCH_STRING="service: esfilter"

# 1. Startzeit erfassen (für die --since-Option von Docker)
START_TIME_EPOCH=$(date +%s)
START_TIME_HUMAN=$(date +"%Y-%m-%d %H:%M:%S")

echo "📺 Tvheadend Real-Time Watchdog gestartet um ${START_TIME_HUMAN}.<br>Monitoring von Logs für Container: ${CONTAINER_NAME}.<br>➡️ Nur Logs **seit** ${START_TIME_HUMAN} werden geprüft."

# 2. Log-Stream überwachen und Counter in AWK verwenden (20 Minuten Timeout)
timeout 20m docker logs -f --since "$START_TIME_EPOCH" "$CONTAINER_NAME" --tail=10 2>&1 | awk -v search="$SEARCH_STRING" '
    # If the search string is found anywhere in the line ($0), exit with success.
    index($0, search) {
        print "!!! AWK MATCH FOUND !!!" > "/dev/stderr";
        exit 0;
    }
    # If input ends without a match, return non-zero so the script can detect timeout/no-match.
    END { exit 1; }
' >> /dev/null

# Capture exit statuses of the pipeline components:
# PIPESTATUS[0] = exit code of `timeout docker logs ...`
# PIPESTATUS[1] = exit code of `awk ...`
ps0=${PIPESTATUS[0]:-0}
ps1=${PIPESTATUS[1]:-0}

# Use awk's exit code to determine whether a match was found; if awk didn't match and timeout returned 124, treat as timeout.
if [ "$ps1" -eq 0 ]; then
    EXIT_STATUS=0
elif [ "$ps0" -eq 124 ]; then
    EXIT_STATUS=124
else
    EXIT_STATUS=$ps1
fi

if [ $EXIT_STATUS -eq 0 ]; then
    MATCH_TIME=$(date +"%Y-%m-%d %H:%M:%S")
    echo "Führe Kommandos aus: ORF2W HD aktivieren, ORF2S HD Aufnahme stoppen, ORF2S HD deaktivieren. (Match-Zeit: ${MATCH_TIME})"
    OUTPUT=$("/var/web/tvheadend/changeprio.sh" 5 "ORF2W HD")
    echo "Output from command to switch to ORF2W HD: $OUTPUT"
    sleep 1
    #OUTPUT=$("/var/web/tvheadend/stoprecording.sh" "ORF2 HD")
#   echo "Output from stop recording for ORF2 HD: $OUTPUT"
#    sleep 1
    OUTPUT=$("/var/web/tvheadend/changeprio.sh" disable "ORF2S HD")
    echo "Output from command to disable ORF2S HD: $OUTPUT"
else
    echo "⚠️ Ein Fehler trat während der Überwachung der Logs auf (Exit Code ${EXIT_STATUS})."
fi
echo "finished monitoring logs for container: ${CONTAINER_NAME}. Exiting watchdog."
exit 0
Adjustments: in the file watchdog.sh the container name: CONTAINER_NAME and in the file: changeprio.sh the TVHeadend IP: TVH_IP, Port: TVH_PORT the user name and the password. Also the path, here: "/var/web/tvheadend/"
The watchdog script could be activated via an entry in Linux Crontab: (sudo crontab -e)
12 19 * * * /var/web/tvheadend/watchdog.shIn addition, TVHeadend could be restarted every night and the channels reset. The restart could take place at a time when TVHeadend is not in use.
Bash-Script: restart.sh
#!/bin/bash
set -euo pipefail

THRESHOLD=0.3
SLEEP=5
TIMEOUT=$((3*60*60))  # 3 hours in seconds

start_time=$(date +%s)

echo "started: restart.sh"

# wait until tvheadend container CPU% is below THRESHOLD or timeout
while true; do
    cpu=$(docker stats --no-stream --format '{{.CPUPerc}}' tvheadend 2>/dev/null || true)
    cpu=${cpu%\%}            # strip trailing %
    cpu=${cpu/,/.}          # handle locales using comma

    # check timeout
    elapsed=$(( $(date +%s) - start_time ))
    if [ "$elapsed" -ge "$TIMEOUT" ]; then
        logaction "Timeout reached after $TIMEOUT seconds, proceeding"        break
    fi

    [ -z "$cpu" ] && sleep "$SLEEP" && continue

    # compare using awk (avoids requiring bc)
    if awk -v c="$cpu" -v t="$THRESHOLD" 'BEGIN{exit !(c < t)}'; then
        break
    fi

    sleep "$SLEEP"
done
echo "correct the configuration files"
NEXT_COMMAND="/var/web/tvheadend/correct-config.sh"
OUTPUT=$("${NEXT_COMMAND}")
echo "Output from command correct Config: $OUTPUT"

echo "/usr/bin/docker restart tvheadend"
/usr/bin/docker restart tvheadend
sleep 20
echo "Führe Kommandos aus: Wechsel auf ORF2S HD und Deaktivierung von ORF2W HD"
NEXT_COMMAND="/var/web/tvheadend/changeprio.sh"
OUTPUT=$("${NEXT_COMMAND}" 0 "ORF2S HD")
echo "Output from command to enable ORF2S HD: $OUTPUT"
sleep 30
OUTPUT=$("${NEXT_COMMAND}" disable "ORF2W HD")
echo "Output from command to disable ORF2W HD: $OUTPUT"
echo "finished"
Auch hier ist wieder ein bestimmter Pfad in Verwendung, hier: "/var/web/tvheadend/" und auch der Kontainername: "tvheadend" ist nicht als Variable ausgeführt.
Für einen Neustart könnte eine weitere Zeile in Linux Crontab hinzugefügt werden: (sudo crontab -e)
20 4 * * * /var/web/tvheadend/restart.shHere are a few screenshots of my settings in TVheadend: DVB-C
First, I created a network under Configuration / DVB-Inputs / Network:

The network can then be assigned to the connected TV adapters, in my case the two adapters of the Hauppauge WinTV-dualHD TV stick, and searched for channels:


The TV channels should appear under "Services" after a while.
Channel search DVB-S: TV adapter, network
A prerequisite for operation is, of course, that the TV adapters register in TVHeadend:

A network is required for the channel search, here for Astra 19.2E:

The network must then still be assigned to at least one TV adapter:

Force Scan starts the search for muxes and adds the channels found as services:

Direct transcoding to H.265 (HEVC)
If you are using a reasonably high-performance mini PC, you can transcode the recordings on the fly as H.264 or even better with H.265, which means they require very little memory and still have very good quality. For HD quality, the stream is reduced from around 10 kB/s to 2.5 kB/s with H.265. The CPU of my mini PC reaches a utilization of about 25% per stream, when using up to 3 tuners: no problem.


I used "MPEG-TS/av-lib" as the container, as otherwise switching to another time (skip) would only work with a very long delay. I have deactivated "Hardware acceleration" as I have noticed that the quality of the recordings is better as a result. I have not yet got to the bottom of the cause.
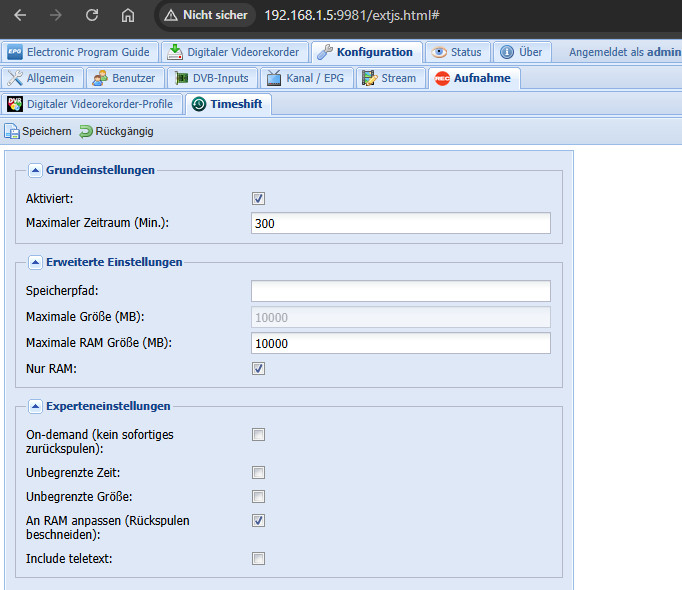
As the mini PC has 32 GB RAM, I have changed the timeshift to "RAM only" to protect the SSD hard disk.
Recording profile: my adjustments
The previously created stream profile can be used in the recording profile:


The "Use EPG running status" settings causes recordings to be cut off for certain channels. The setting can be deactivated per channel, whereby the "Pre-recording padding" and "Post-recording padding" of the recording profile is used:

I then adjusted the duplicate handling and DVR file storage time for certain "auto recordings" respectively:


Wrong sound track: e.g. acoustic picture description
After switching from DVB-C to DVB-S, a different audio track crept in as standard for certain TV channels: As a result, certain programs were in original English by default, or provided with an acoustic picture description. This behavior can be easily adjusted with a "stream filter":

IGNORE can be used to ignore certain audio streams. With Action: "EMPTY", the audio stream can still be used if no other stream is available. The following example:
Language German (ger) should be used: USE, "mis" should not be used: IGNORE.
The last filter: EMPTY is a fallback if no audio stream is available due to the first two filters: e.g. a stream that is not "ger". ("mis" would then also be possible in the fallback: the filter for "mis" would therefore not have to be ...)
Delete oldest recordings first
TV-Headend stops the recordings if the limits in the recording profile have been exceeded: "Manage free memory in MiB" and "Manage used memory in MiB".
To delete the oldest recordings and to be able to record new ones, I have a small bash script running on the host operating system:
#!/bin/bash

RECORDINGS_DIR="/mnt/store/daten/recordings"
STORE_MOUNT="/mnt/store"
MIN_FREE_GB=60
MAX_USED_GB=300

get_free_gb() {
    df -BG --output=avail "$STORE_MOUNT" | tail -1 | tr -dc '0-9'
}

get_used_gb() {
    du -sBG "$RECORDINGS_DIR" | awk '{print $1}' | tr -dc '0-9'
}

while true; do
    free_gb=$(get_free_gb)
    used_gb=$(get_used_gb)

    if [[ $free_gb -ge $MIN_FREE_GB && $used_gb -le $MAX_USED_GB ]]; then
        break
    fi

    # Find the oldest file (null-terminated)
    oldest_file=$(find "$RECORDINGS_DIR" -type f -printf '%T@ %p\0' | sort -z -n | head -zn 1 | cut -z -d' ' -f2-)

    if [[ -z "$oldest_file" ]]; then
        echo "No more files to delete."
        break
    fi

    # Remove the file safely
    printf 'Deleting %s to free up space...\n' "$oldest_file"
    rm -f -- "$oldest_file"
done
The script monitors the recordings folder, in my case: /mnt/store/data/recordings and the free space of /mnt/store and deletes old recordings if less than 60GB is free or the recordings take up more than 200GB.
The recordings are cleaned up daily via an entry in Cron (sudo crontab -e):
3 3 * * * sudo /scripts/cleanup-recordings.sh > /dev/null 2>&1Access on the go via the Internet: Secure and without VPN
To be able to program certain shows on the go or stream shows live to the smartphone, I have provided the default user in Tvheadend with a user name and password. An additional DNS entry on the Internet and the existing port forwarding including reverse proxy allows me access via the Internet, completely without VPN, see: secure https connection: Traefik Reverse Proxy + Let's Encrypt
Here is the Docker Compose config I used:
/conf/tvheadend.yml file Remote access
http:
  routers:
    tvh:
      entrypoints: "websecure"
      service: "tvh@file"
      rule: "Host(`tv.domain.tld`)"
      tls:
        certresolver: "myresolver"
  services:
    tvh:
      loadbalancer:
        servers:
          - url: "http://192.168.1.5:9981"
Integrate via:
version: "3.3"
services:
  traefik:
    image: "traefik"
    container_name: "traefik"
    command:
...
      - "--providers.file.directory=/etc/traefik/conf"
...
    volumes:
...
      - "./conf:/etc/traefik/conf"
Client access: TVs and mobile devices
For access in the local network, I use a FireTV stick in each of the TVs. Kodi is also available as an Android app, which turns the cell phone or tablet into a TV. The Android app crashes every now and then when I start it. If the app no longer starts, clearing the cache in the app settings helps.
I currently access the Internet via the Tvheadend web interface. Since the web interface is not optimized for mobile devices, I created a fork of TVHadmin-JS on Github and adapted it to my needs: https://github.com/LiBe-net/TVH-Mobile.
Alternative receiver hardware for SAT?
Instead of the server setup with TVHeadend described here, a receiver with e.g. OpenATV as image can also be used. As an example, the Octagon SF8008 offers a dual SAT tuner. The receiver also has a card reader with which OSCAM can be operated directly on the receiver. The device could also be used as a SAT>IP server.

Conclusion
Switching from a classic PVR hard disk receiver to a mini-server setup with Docker and DVB tuners has proven to be a practical solution. A mini PC like the Beelink 5560U and Tvheadend under Docker provides a solid foundation for TV reception and streaming for multiple TV sets: without any coax cables: purely via Ethernet or WLAN. The setup enables direct transcoding of recordings to H265 and access via the Internet.
 ({{pro_count}})
{{percentage}} % positive
 ({{con_count}})