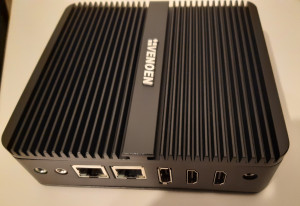
Cheap and economical Docker Mini Server for home use
If you want to run a small server at home, you need hardware with low power consumption and still enough performance. Currently, I use a self-built NAS for the operation of my Docker containers. The hardware serves as network storage and at the same time as a platform for running my Docker containers. To optimize the setup, it would be better to separate the two tasks and run the server services on their own hardware. Since the data on a single device it not secure anyway, a NAS could additionally be used as a backup device for the server.
As a server, I looked at a mini PC. Thanks to the built-in CPU with 10 Watt TDP and passive cooling, the PC consumes relatively little power and has enough performance to run various web services with high performance. Specifically, I tested a cheaper alternative to the better-known Intel NUC PCs, a mini PC from VENOEN.
As an alternative to the Veneon Mini-PC, I am currently using a Mini-PC with an N100 processor.
For more performance, a Mini-PC with an AMD processor can also be used, e.g. the AMD Ryzen 5 5560U with a similarly low power consumption has more performance than an N100 processor.
Unpacking
The VENOEN Mini PC comes with a power supply, WLAN antennas, HDMI cables and SATA cables. The screws for attaching to a VESA mount would allow operation on the back of a monitor, but is not relevant for use as a server. Also, the pre-installed Windows 11 is more beneficial for an office PC, but not the first choice for operation as a server.
For my server services, such as Nextcloud or Home Assistant, I use Docker containers exclusively. For running Docker containers, a Linux distribution like Ubuntu Server is a good choice:
Ubuntu Server Installation
In preparation, I have recorded a USB stick via the program balenaEtcher with the Ubuntu installation image, see: bootable live USB stick with Ubuntu. Plugged the USB stick into the PC, it appears by pressing F11 when starting the computer:
By selecting the USB stick, the Ubuntu installation can be started.
Backup
To avoid losing Docker container data, it should be regularly backed up to another device, see: Practice: Backup Docker container data: Volumes / Bind Mounts.
Power consumption
Due to the fact that a server usually runs around the clock, attention should be paid to its power consumption. A mini-PC is similar to a laptop in terms of hardware, so it delivers approximately the performance of a normal PC, with lower power consumption. My power meter even shows under 10 watts when idle:
Unfortunately, I can't say exactly how accurate the meter is at low currents. Compared to my home-built NAS, however, the mini-PC uses even less power and delivers more performance thanks to the new CPU.
Conclusion
Mini PCs are great for running a home server in my opinion. The small devices consume relatively little power and passively cooled variants are absolutely silent. The performance for home use is usually more than sufficient and suitable for hosting multiple server services, such as a private cloud and running your own smart home solution.
 ({{pro_count}})
{{percentage}} % positive
 ({{con_count}})


