Raspberry PI as WLAN access point

As an extension for my home network, I tested the Raspberry Pi 3 as a WLAN access point. Due to the integrated WLAN chip, the minicomputer can easily be used as an additional WLAN access point on an Ethernet cable.
As DHCP, I use my existing router. The Raspberry was connected via a network cable and serves as an additional WLAN receiver for another floor, see also: Setting up a home network: Extend LAN and WLAN | improve.
Prerequisite
- Raspberry Pi 3B (with integrated 2.4GHz WLAN), or better: Raspberry Pi 4 with additional 5GHz WLAN
- min. 4GB MicroSD
- USB charger for power supply
- PC with SD card slot for uploading the image
Installation
A very simple way to turn a Raspberry Pi into a WLAN access point is certainly the use of an OpenWrt image. Alternatively, a Raspbian image can be used.
OpenWrt image
To install the image, you can use the Raspberry Pi Imager: https: //www.raspberrypi.com/software/, or the Win32Diskimager , see: Raspberry Pi Startup
The image itself can be downloaded from OpenWrt page: https://openwrt.org/toh/raspberry_pi_foundation/raspberry_pi

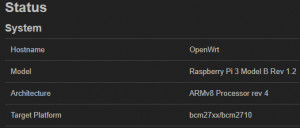
After installing the image on a SD card and booting the Raspberry it gets the IP address 192.168.1.1, as user can be used initially root without password to access the web gui.

Raspbian
Alternatively to the OpenWrt image, a standard Raspbian image can be used: https://www.raspberrypi.org/downloads/.
see also: Raspberry Pi Startup
For Raspbian the configuration is done in the terminal (shell), see Configuration - Raspbian Image
As an alternative to the Raspbian image, an OpenWrt image can also be used directly:
https://openwrt.org/toh/raspberry_pi_foundation/raspberry_pi
OpenWrt provides a comfortable Web-GUI for the configuration


Configuration - Raspbian Image
So that the Raspberry does not have to be connected to a monitor after installing the image, remote access can be activated by creating a file with the name "ssh".

If the Raspberry is connected to the existing router via Ethernet (RJ45), it gets a DHCP address from the router. After the address has been noted by the admin interface of the router, the Raspberry can easily be configured via putty. As user "pi" with the password: "raspberry" is stored.
Of course the password should be changed at the first access by using the command "passwd", see also: Raspberry Pi Startup
After we have connected via Putty, all available updates should be installed first:
sudo apt-get update
sudo apt-get upgrade
For the configuration of the access point we need the following packages:
Bridge-Utils and hostapd, the latter provides the basis for the function of the access point.
sudo apt-get install hostapd bridge-utilsConfigure access point
The following config file can be created for the configuration of the access point:
sudo nano /etc/hostapd/hostapd.confDon't be surprised, the file is not yet present by default... If it is nevertheless present, it can be completely overwritten with the following content. The parameters for wpa_passphrase and ssid should be adjusted of course:
ssid=RaspberryAP
wpa_passphrase=WLANPASSWORT

driver=nl80211
country_code=DE
ieee80211d=1
hw_mode=g
beacon_int=100
channel=9
ieee80211n=1
ht_capab=[SHORT-GI-20][DSSS_CCK-40]
interface=wlan0
ap_isolate=1
bss_load_update_period=60
disassoc_low_ack=1
preamble=1
wmm_enabled=1
ignore_broadcast_ssid=0
uapsd_advertisement_enabled=1
auth_algs=1
wpa=2
wpa_pairwise=CCMP
bridge=br0
wpa_key_mgmt=WPA-PSK
okc=0
disable_pmksa_caching=1
macaddr_acl=0
As a basis for the settings I used the config file from my Open-WRT-Router (v18.06) and removed not supported settings until the hotspot could be started.
For security reasons, the file should only be read and changed by the owner.
sudo chmod 600 /etc/hostapd/hostapd.confThe user "pi" can still edit the file.
Now the configuration of the network follows:
sudo nano /etc/network/interfaces# WLAN
auto wlan0
allow-hotplug wlan0
iface wlan0 inet manual
wireless-power off
# Netzwerkbrücke
auto br0
iface br0 inet dhcp
bridge_ports eth0 wlan0 # build bridge
bridge_fd 0 # no forwarding delay
bridge_stp off # disable Spanning Tree ProtocolLast but not least, we set up an automatic startup of the Access Point:
sudo nano /etc/default/hostapdRUN_DAEMON=yes
DAEMON_CONF="/etc/hostapd/hostapd.conf"Troubleshooting
hostapd can also be started with the following command. Information about the start and the connected devices is displayed in the terminal:
sudo hostapd -dd /etc/hostapd/hostapd.conf2 hotspots at the same time
Additionally I wanted to use a 2nd adapter, so an additional USB-WLAN stick as hotspot. In a single hostapd config I did not get this to work, so I just created a second hostapd.conf file and let it activate on startup of the Raspberry using crontab:
sudo crontab -e@reboot sudo hostapd -d /etc/hostapd/hostapd2.conf5GHz and Raspberry Pi 3
With an appropriate USB WLAN stick it should also be possible to operate the hotspot on 5GHz. Unfortunately I could not get my Edimax EW-7612UAn adapter to do this. The output at startup using hostapd -dd was without noticeable errors, also the hotspot was present, but a connection was not possible. I might try this again at a later time, or a Raspberry PI 4 would certainly be better suited ...
Deauthenticated due to local deauth request
in cat /var/log/syslog
possible solution?
apt-get install havegedWithout reboot: sudo service hostapd restart
Conclusion
With a measured power consumption of 1 to 2 watts and low acquisition costs, the Raspberry offers a real alternative to a real access point. The integrated WLAN chip of the Raspberry Pi 3 is not yet capable of 5GHz, but the 2.4GHz WLAN reached more than 40 Mbit in my tests with iperf and is thus sufficient for smooth playback of HD video streams. A Raspberry Pi 4 would certainly be better suited.
 ({{pro_count}})
{{percentage}} % positive
 ({{con_count}})