For direct API access to the Fronius inverter, Modbus can be used as an alternative to the Rest API interface (Solar API). Modbus TCP enables the data to be read out via the network and certain settings to be changed. For example, charging or discharging can be forced, or a charging or discharging limit can be set. Why? To get even more out of the system.
Modbus setup prerequisite
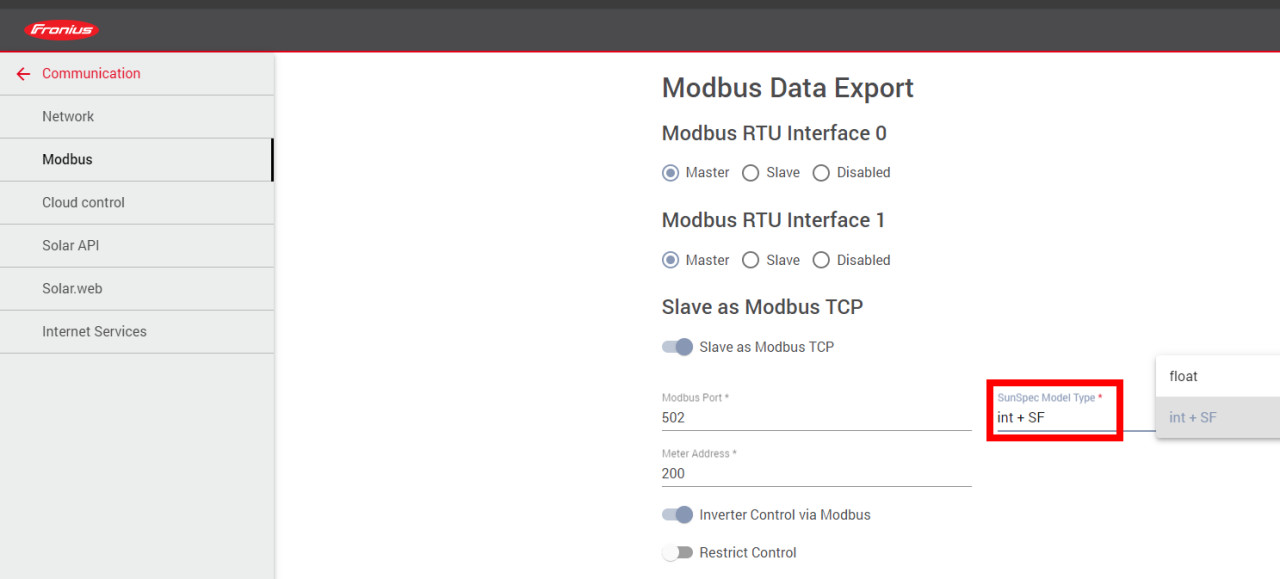
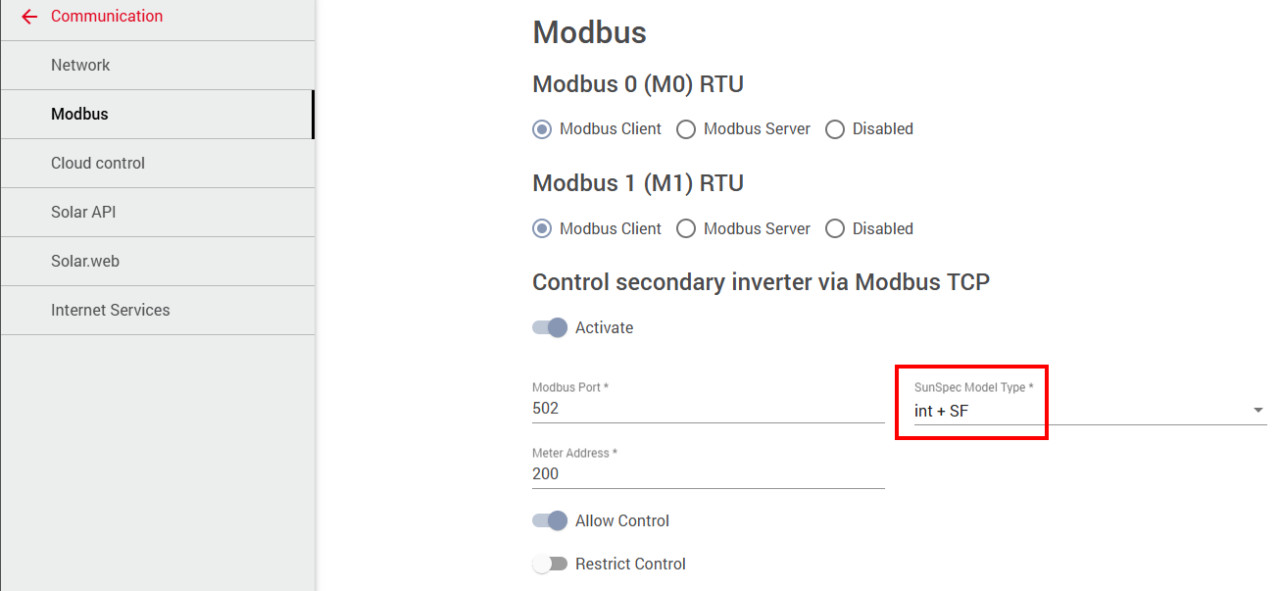
Activate interface on the inverter
There are two different SunSpec Model Types for Modbus: "int + SF" and "float":
With the new firmware, the terms were renamed slightly: "Master" / "Slave" became "Modbus Client and "Modbus Server":
All registers mentioned in this article refer to the SunSpec Model Type "int + SF".
Home Assistant Setup
I have added the following lines to configuration.yaml so that Home Assistant can connect to the Modbus interface.
modbus:-type:tcp# Put your Gen24 IP address herehost:192.168.1.137port:502name:gen24sensors:-name:reading_battery_settingsslave:1count:24address:40345scan_interval:5data_type:customstructure:">10H2h4H8h"
✓
If you have set the SunSpec Model Type to "float", you must add 10 to the registers used here. e.g. the start address for reading the battery is 40345 for "int + SF", with "float" 40355 should be used as the address: "address: 40355". +10 applies to all registers mentioned in this article.
The sensor "sensor.reading_battery_settings" reads all relevant Modbus registers and serves as the basis for the template sensors mentioned later:
From the sensor "reading_battery_settings", the individual values can be extracted via a value_template:
change the charging behavior: Changing BYD Charging
The settings are changed via Modbus registers.
Relevant Modbus registers for controlling the charging behavior
These 4 registers are essentially relevant for controlling the battery:
According to Fronius documentation:
Register
Register Value
Register Value Description
Home Assistant Template Sensor
StorCTLMod
40348
0 ... no limitation 1 .. Load limitation 2 .. Discharge limitation 3 .. Charge/discharge power
Limitation mode
bit 0: CHARGE
bit 1: DiSCHARGE
Template sensor name: BYD.StorCTL_Mod
{% set storCTL_mod= states('sensor.reading_battery_settings').split(',')[3] | int%}
{{ "in" if storCTL_mod == 1 else
"out" if storCTL_mod == 2 else
"in and out" if storCTL_mod == 3
else "auto"  }}
MinRsvPct
40350
Setpoint for the maximum discharge rate. Default is MaxDisChaRte
So that the registers in HA can be displayed individually, I have created a template sensor for each of the registers in the "Settings", "Helpers" menu: "BYD.StorCTL_Mod", "BYD.MinRsvPct","BYD.OutWRte", "BYD.InWRte". The content for the template sensor can be taken from the previous table.
I have created scripts for the individual actions so that several registers can be adjusted in one process:
Home Assistant scripts
Set loading settings to default
The following tabs set the loading behavior to the default values:
Register
Value
Register Value Description
StorCTLMod
40348
0
No limitation
MinRsvPct
40350
500
Sets MinRsvPct to 5.0 % WChaMax
OutWRte
40355
10000
Sets outwrte to 100%
InWRte
40356
10000
Sets inwrte to 100%
A script can be used to set the registers: "Settings", "Automations & scenes", "Scripts", "ADD SCRIPT":
To keep a little more reserve capacity in the battery, the default values can be adjusted slightly by setting the value for MinRsvPct to e.g. 3000 for 30% charge reserve. The value set via Modbus competes with the settings in the Fronius web interface: the higher value wins:
The following registers set the charging behavior to the default values with 30% charging reserve (SoC):
Register
Register Value
Register Value Description
StorCTLMod
40348
0
No limitation
MinRsvPct
40350
3000
Sets MinRsvPct to 30.0 % WChaMax
OutWRte
40355
10000
Sets outwrte to 100%
InWRte
40356
10000
Sets inwrte to 100%
A script can be used to set the registers: "Settings", "Automations & scenes", "Scripts", "CREATE NEW SCRIPT":
To charge the battery independently of the current power consumption or the current PV power, the following 3 registers can be set as follows. I have created an input helper in advance so that the charging power can be changed via the Lovelace dashboard:
Integrated in the dashboard, the charging power can be conveniently adjusted in the interface:
Here are the necessary tab settings for forced charging:
Only allow discharging of the energy storage device
This behavior can be achieved by limiting the maximum charging power to 0% => results in window [0 W, 3300 W]
Register
Value
Description
StorCTLMod
40348
1
Bit 1 switches load limit value active, bit pattern: 01
OutWRte
40355
is not relevant in this case
InWRte
40356
0
Set charge limit to 0% of WchaMax
Allow neither charging nor discharging
This behavior can be achieved by limiting the maximum charging power to 0% and limiting the maximum discharging power to 0% => results in window [0 W, 0 W]
Register
Value
Value Description
StorCTLMod
40348
3
Switches both limit values active, bit pattern: 11
Charging and discharging with a maximum of 50% of the nominal power
This behavior can be achieved by limiting the maximum charging power to 50% and limiting the maximum discharging power to 50% => results in window [-1650 W, 1650 W]
Register
Value
Description
StorCTLMod
40348
3
Switches both limit values active, bit pattern: 11
Charging in the range from 50% to 75% of the nominal power
This behavior can be achieved by limiting the maximum charging power to 75% and limiting the maximum discharging power to -50% => results in window [1650 W, 2475 W]
Register
Value
Description
StorCTLMod
40348
3
Switches both limit values active, bit pattern: 11
OutWRte
40355
-50
Set discharge limit to -50% of WchaMax
InWRte
40356
75
Set charging limit to 75% of WchaMax
The battery status in Fronius Solar.web changes to "Forced recharge"
This behavior can be achieved by limiting the maximum charging power to -50% and limiting the maximum discharging power to 50% => results in window [-1650 W, -1650 W] 44
Register
Value
Description
StorCTLMod
40348
3
Switches both limit values active, bit pattern: 11
In order to keep a residual capacity of 30% in the battery in winter and thus be able to use the PV point in an emergency and also not waste any battery capacity, I have come up with the following automation:
If the battery is fully charged, the full capacity of the battery should also be available; accordingly, the charge limit should be set to the default value of 5% when a charge level of 100% is reached.
To ensure that any 30% charging reserve set on sunny days is not wasted, the limit could be set to the default value of 5% based on the PV forecast at night: This would allow the 30% charging reserve to be consumed before the PV system produces electricity and refills the battery.
Sunspec is an open standard for reading energy data. The "SunSpec" HACS repository of the same name makes it possible to query data from the inverter via Modbus:
Normally, Fronius' automatic self-consumption optimization works for almost all everyday situations.
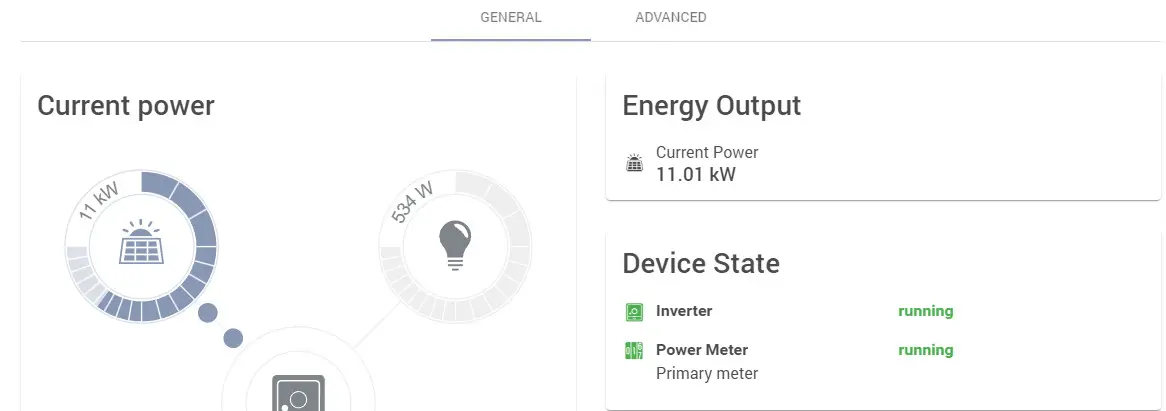
One reason why I still wanted to intervene in the charging behavior was the fact that my PV modules could supply more DC power at peak times than the inverter can process on the AC side. Unfortunately, the Gen24 is limited on the DC side. Even though the maximum panel power of the Gen24 10.0 Plus is specified as 15kW, the Gen24 can only handle a little more DC power than AC: at a total of 11kW DC, despite battery charging, that's it.
Without battery charging, the production ends at approx. 10.3 KW DC.
Is there a way to limit the discharging of the Battery to the exact amount of the consumption of the house?
So when I charge my cars is it possible to click on a button to prevent charging the car with my battery?
Btw. good job and many Thanks.
B
Bernhard
Hi, i think this can in theory be done, if you have the consumption-Values from the house via smart-meter.
But if the consumption changes very fast, for example if the stove is constantly turning on and off: The automation can then only react with a delay and changing the charging would have an extra delay.
A
anonym
Oh, you are fast...
I already have those variables... (sensor.solarnet_verbrauchsleistung in my case)
I tried things like:
{{ 65536 - (states('sensor.solarnet_verbrauchsleistung')|int(0) / states('sensor.wchamax')|int(1) * 1)|int }}
but it never worked for me.
L
Lobotschobi
· changed
Dear Bernhard, thanks for the interesting article. I already implemented it to my HA installation, too. A point that took me a while: The above process does not allow to have the HACS repository SunSpec installed in parallel as described in your other article. When having removed it, it worked immediately (I assume it is a port or module conflict when both is running - SunSpec and Modbus).
As I am not experienced I struggled with the feature at the beginning of your article but not described in detail: "force discharge".
The battery management of the fronius inverter accessible by the web interface allows to set a "minimum discharge power" ("minimale Entladeleistung"). What I do not use for myself is sold. As I am limited in selling electricity this helps to force the battery to discharge in the morning before sun rises in summer. So I can optimize the outcome of my system.
How did you implement this feature? Is there a related value to MinRsvPct for maximum charge?
Thanks a lot and again appreciated your article!
B
Bernhard
Thank you for your feedback:
This is strange, as i have SunSpec in parallel to the described Modbus-Setup in configuration.yaml without any issues. Regarding force charge and discharge: the input_number: charging_power is used to limit force charging and forced discharging. MinRsvPct sets the state of charge in percent for force charge till the battery should be loaded. For now i implemented the Feature only via buttons und the input_number to start it manually. In future i plan to trigger this via automation and plan to write an update on this.




 ({{pro_count}})

Questions / Comments