Home Assistant Automation - Possibilities & Basics

From controlling the pool pump to the heating to the robotic mower, automations in Home Assistant offer a way to make things around your home really smart.
Initially, I only used the automations in Home Assistant to replace a timer for my pool pump. To do this, I first created an automation for turning it on and one for turning it off: Works, but somehow two automations for controlling one device still don't feel quite right. For this reason, but also because more sophisticated processes have arisen in the meantime, I looked at the possibilities of the automations in detail. With Home Assistant, I was even able to use my previous robotic lawnmower control replace and recently even control my heating to use the energy from the PV system as much as possible.
Complicated, or would you prefer simple?
Less is often more: good automations are above all simple, logical and therefore self-explanatory. First of all, a few points that I would do differently in new automations.
Lessens learned
- I would not create an automation for every trigger, e.g. switching a device on and off can be implemented with just one automation.
- Conditions in the "But only if (optional)" area can be ignored, these are only useful for really simple automations ...
- A repetition of the trigger in the "If-then" actions can usually be solved more elegantly.
Create automation
A new automation can be added in the settings and "Automations & Scenes".


The concept: Trigger (-> condition) -> action
Automations are started by one or more stored triggers (=When), for example at a certain time or when the status of a sensor or device changes. Before executing one or more actions, the automation could be checked for certain conditions (And if). Could, because the "And if" conditions are usually better placed in the actions (Then do).

Here is a short overview of the possible triggers for starting an automation:
Trigger: When -> Start automation
The triggers in the automations initially do nothing other than start the automation.

| Trigger | Device description |
|---|---|
| Device | Triggers when the status of a certain device changes, e.g. when a device is switched off or on, or when a certain value, e.g. the temperature of a temperature sensor, is above or below a specified value. |
| Entity / Numeric state | Triggers when the numerical value of an entity is above or below a certain value. |
| Entity / State | Triggers when the status of an entity changes. |
| Time and location / calendar | Calendar entities can be used and provided by other integrations. Calendar triggers enable automation based on the start or end of a calendar entity event. |
| Time and location/ Sun | Triggers before sunrise or sunset, or after sunrise or sunset. Optional: Offset: Format: HH:MM:SS Example: Offset: -02:00:00 = 2 hours before sunrise or sunset; Example: Offset: 02:00:00 = 2 hours after sunrise or sunset |
| Time and location / Time | Time trigger, at a fixed time or via a date/time helper. |
| Time and location / Time pattern |
The time pattern trigger triggers when the hour, minute or second of the current time matches a specific value. This trigger also enables the automation to be triggered at regular intervals, e.g. every 5 minutes:
|
| Time and location / Zone | Triggers when an entity with a location enters or leaves a zone, e.g. device tracker entities. For example, when a WLAN device is at home or away, see: ha-integrations#device-tracker-openwrt. |
| Other triggers / Geolocation | The geolocation trigger is triggered when an entity appears or disappears from a zone. For example, when a weather event occurs in the zone in which Home Assistant is located. |
| Other triggers / Home Assistant | Triggers when Home Assistant starts or stops. |
| Other triggers / Manual event | When an event is received |
| Other triggers / MQTT | Triggers when an MQTT message is received. |
| Other triggers / Persistent notification | When a persistent notification is added or removed. |
| Other triggers / Sentence | When Assist matches a sentence from a voice assistant |
| Other triggers / Tag | Triggers when a tag is scanned. |
| Other triggers / Template |
Triggers when a template contains the value true. E.g. when one entity becomes larger than another: see also: Home Assistant Templates |
| Other triggers / Webhook |
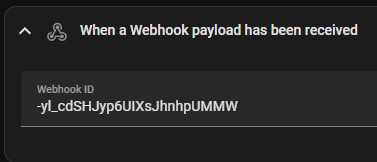
Triggers when a webhook payload is received on the /api/webhook/{ID} endpoint. The ID is generated when the trigger is created: Webhooks support HTTP POST, PUT and HEAD requests. When the webhook endpoint is called, form data, JSON data or URL query parameters can be transferred to the template: trigger.data, trigger.json or trigger.query. |
Conditions (optional: And if)
Optionally, the started automation can be checked for certain conditions.
Advantage: The conditions for each action can be defined individually in the actions.
| Condition | Condition Description |
|---|---|
| Device | Checks whether a specific device has a specific status or a specific value. |
| Entity / Numeric state | Checks the numerical value of an entity to see whether it is above or below a certain value. |
| Entity / State | Checks the status of an entity |
| Time and location / Sun |
Before sunrise or sunset, or after sunrise or sunset. Optional: Before offset (Offset) or After offset (Offset): Format: HH:MM:SS |
| Time and location / Time | Checks for a fixed time or via a date/time helper. |
| Time and location / Zone | Checks whether an entity with a location is in a zone or not... |
| Building blocks / And | Link several conditions if several conditions are fulfilled. |
| Building blocks / Not | With Not, one of the conditions listed here can be checked to see if the condition is not fulfilled. |
| Building blocks / Or | Link several conditions if one of the conditions is fulfilled. |
| Other conditions / Template | Template condition, see also Home Assistant Templates |
| Other conditions / Triggered by | Checks whether the automation was started by a specific trigger (specific trigger ID). |
If the defined conditions are met, the defined actions are executed:
Then do

An action can be executed on a specific device or a specific service. To simplify access to the possible services, the "ADD ACTION" wizard contains lots of shortcuts to the underlying action: "Call service". A specific logic for automation, such as conditions or additional queries or decisions, can be mapped using the existing building blocks .
Actions

| Action | Action Description |
|---|---|
| Device | Execute an action on a specific device, e.g. switch a specific device on or off. |
| Button | Shortcut to "Execute service", "Button" |
| Camera | Shortcut to "Run service", "Camera". |
| Cover | Shortcut to "Execute service", "Cover": Stop tilt, switch tilt, set tilt position, open, opening angle, set position, close, stop, switch |
| Light | Shortcut to "Execute service", "Light" |
| Notification | Shortcut to "Execute service", "Notify". A notification can be sent to a cell phone here as an example. Prerequisite: installed Home Assistant app. |
| Number | Shortcut to "Execute service", "Number" |
| Scenes | Activate a specific scene; shortcut to "Execute service", "Scene" |
| Select | Shortcut to "Execute service", "Select". |
| Switch | Shortcut to "Execute service", "Switch" |
| Vacuum | Shortcut to "Execute service", "Vacuum" |
| Helper | Shortcuts to various other services related to existing helpers, such as pressing an enter key, selecting an option in a selection field or entering certain values for other helpers. |
| Building blocks |
The blocks in the actions can be selected at this point, or via Then do: "+ ADD BLOCK". |
| Other actions | Call service, Manual event, Alarm Control Panel, Automation, Backup, Climate, Command Line, Conversation, Device Tracker, Fan, FFmpeg, Home Assistant Cloud, Home Assistant Core Integration, Home Assistant Frontend, Humidifier, Lawn Mower, Lock, Logbook, Logger, Modbus, MQTT, Persistent Notification, Person, Recorder, Retry, Scripts, Siren, Statistics, System Log, Text, Text-to-speech (TTS), Update, Valve, Water Heater, Weather, Zigbee Home Automation, Zone |
Building Blocks

| Building Block | Module description |
|---|---|
| Choose | Execute one or more actions based on one or more conditions. (The Select action can use the same conditions that are also present in the global conditions of the automation) |
| Condition |
The conditions essentially mirror the conditions in the"And if" section and can be used here as an alternative. Possible conditions: Triggered by, Devices, Not, Numeric state, Or, Sun, Template, And, Time, Zone, State. |
| Define variables | Define variables to use them in a template, for example. |
| If-then | If, then, else (If-then, else). If certain conditions are met, start a certain action, otherwise execute a certain other action. (The if-then action can use the same conditions that are also present in the global conditions of the automation) |
| Repeat | Repeat an action several times |
| Run in parallel | Start several actions simultaneously |
| Stop | Stop automation |
| Wait for a template | Waiting for a template: until this is evaluated as true. |
| Wait for a trigger | Wait for a trigger, incl. timeout. |
| Wait for time to elapse (delay) | Wating time for the automation. So that the following actions are started with a delay. |
YAML
When creating an automation in the visual editor, a YAML text with all relevant information is created in the background. The YAML text can be edited and customized in a text editor.

Traces
In addition to the history, the processes of already executed automations can be analyzed in detail:


The number of saved sequences can be adjusted via the stored_traces variable in the YAML file:
trace:
  stored_traces: 100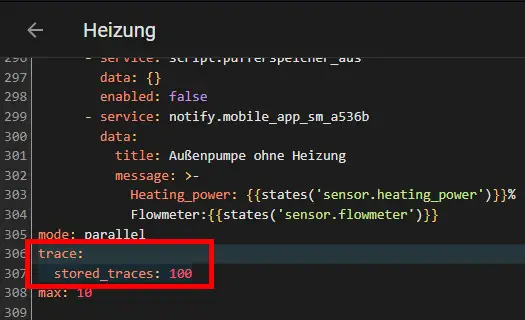
When using multiple if-conditions, the traces were originally relatively difficult to interpret, as there was no indication of the condition or its entities: although the step details showed the result of the queries, they only gave an indication of which condition led to the result by means of internal numbering:
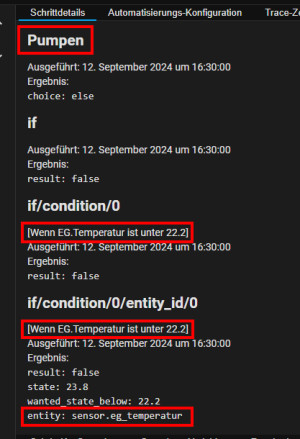
HA automation: step details (traces)
My code change has been accepted: In the current Home Assistant version, additional information about the step details is now displayed in the automation traces. ... continue reading
My problem with the concept: trigger - condition - action
As simple as the concept of Home Assistant Automations is, the implementation in practice was initially unclear to me. My issue with the Automations can be described with a simple example: with a temperature sensor and a heater. If the temperature falls below a certain value, the heating should be activated and switched off when a certain target temperature is reached. The implementation requires two triggers for the two temperature values. The associated actions are then switching the heating on and off. To ensure that the triggers start the correct action, two automations can be created: one for switching on, one for switching off.
Alternatively, both triggers and the associated actions could be stored in one automation. After both triggers only start the automation, the actions now lack the information which of the two actions should be started. One possibility is to use an additional if-then query. The "If" in the if-then query often repeated the threshold values of the trigger in my first automations. e.g. If the temperature is higher than a certain value, I used the temperature values in the trigger and "If" in the actions. At the latest when using conditions, such as different temperature values for day and night, an automation could quickly become confusing. Since the conditions are used for the complete automation, the conditions area is not very helpful here. But also several automations for e.g. switching on during the day, switching on during the night and switching off and on during the day do not really make the implementation clearer.
Combining multiple triggers and actions? Possible solutions at a glance
- 👎 Only one action per automation:
Advantage: Separate conditions and triggers can be used for each action.
Example: Switching a device on and off in separate automations: One automation for switching on and one automation for switching off. - 👍 Triggers with IDs executed in an If-Then or Select action:
If an ID is added to a trigger, it can be linked to an If-Then or Select action in the actions. - 👍 Regular start of the automation via a time pattern
If an automation is started regularly, the logic can be completely mapped in the actions: Certain checks with if-then or select allow the respective action to be linked directly and clearly. - Another option would be to use templates in the triggers, which would allow the logic to be implemented as soon as it is triggered: An update on this will follow.
Switching on and off: one automation or two?
As an alternative to two automations for switching a device on and off, an ID can also be assigned in the triggers and used in the actions:
By means of the ID, the actions can be reacted to in an if-query and the device can be switched on or off accordingly:


Trigger regularly and use only the actions?
To keep track of more complex automations, they could be started regularly and the logic within the actions could be mapped. For this approach, a "time pattern" can be used as a trigger, e.g. to start the automation every 5 minutes:
If the automation is started on a regular basis, all conditions can be directly linked to the actions by using multiple "if-then" or "choose" actions:

The disadvantage of using a time pattern is certainly the possible delay until the automation is started the next time. For time-critical actions, an additional trigger could be added at this point. Another disadvantage of the time pattern is that a new entry is saved in the sequences each time it is triggered, even if nothing has changed in the actions. Nevertheless, the advantages of a time pattern outweigh the disadvantages: A significant advantage is that the actions are not dependent on specific triggers. If, for example, certain statuses are set in the actions, such as switching on a relay or switch, the automation can be started at any time, even if it has missed a certain status change. Without a dependency on the triggers, the conditions used in the if-then actions can also be tested more easily:

Alternative approaches or ideas can be discussed at any time in the comments ...
Alternatives?
Even if an additional automation platform, such as Node-Red, certainly offers a better overview for more complex processes, I still try to stick to the Home Assistant automations, admittedly mainly to avoid the overhead and the additional dependency on another service. Home Assistant's mobile app also offers a better way of optimizing the automations on your cell phone.
Balcony power plant or PV system surplus
Not always, but every now and then - my balcony power plant delivers a surplus of electricity on sunny days. So that I don't give it away, I start the pool pump when there is a surplus and stop it again when there is no more surplus power available. ... continue reading
Control heating: PV surplus with ESP32 & Home Assistant
After around 20 years, I was able to use Home Assistant and an ESP32 to take control of my heat pump and control it. Combined with the performance data of the PV system, Home Assistant is able to use the PV surplus as directly as possible for heating and thus increase self-consumption: ... continue reading
Home Assistant: PV surplus, hot water: heating element
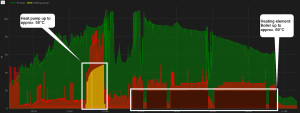
Besides the Control my heat pump I can alternatively heat the hot water via a switchable socket and a heating rod. Since my heat pump can only heat the water up to 50°C, the heating rod allows me to generate higher temperatures. If the hot water is heated by an additional 10°C on a day with sufficient sunshine, no hot water heating is required the following day. If the forecast for the expected PV harvest day for the following day falls below a certain value, I have put together an automation t... ... continue reading

Home Assistant: Sockets control robotic lawn mowers
As mentioned in a previous post, I control my robotic lawnmower, a Husqvarna Automower, affectionately known as Oswald, via a controllable power outlet. The principle behind this is that the mower only starts when the charging station gets a current from the socket. My motivations for the power outlet were the lack of a rain sensor and the lack of available control options. For a few years I used a simple PHP page for control, see: www.script-example.com/smartplug-steuerung and later on I deve... ... continue reading

Home Assistant snow detection PV system
In a PV system, the voltage increases with the number of PV modules, even in poor lighting conditions. This is different if certain modules are partially or completely covered in snow. I have taken advantage of this fact and created a snow detection function in Home Assistant. Why? To correct the PV forecast for the next day and adjust the heating control accordingly. ... continue reading
HA-Sensor numeric: unknown
If a numerical comparison: greater than or less than - is used in the automation, the automation stops if the sensor has the status "Unknown" for any reason: ... continue reading
Conclusion
A smart home solution only develops its full potential when certain devices can be controlled automatically. The intelligent control of individual devices can not only increase convenience, it can also save electricity or use it more wisely. The automations in Home Assistant initially seemed tidy and easy to understand to me. Using it in practice then had a few pitfalls. Once I got used to the idea of leaving the conditions area to one side and implementing the logic with if-then or select actions, I am able to put together even more complex automations clearly and sustainably with Home Assistant, For example, the override of my heating system.
 ({{pro_count}})
{{percentage}} % positive
 ({{con_count}})

